How to make an Independence Day can cooler-free SVG included
Our Independence Day holiday is fast approaching and we want to help you celebrate by giving you a quick and patriotic craft that you can do in under half an hour. Come join us as we show how to make a decorated can cooler for your favorite beverage of choice!
Materials Needed:
- Cutting Machine
- Cutting Mat
- Weeding and Burnishing Tools
- Vinyl in your choice of colors
- Transfer Tape
- Can Cooler
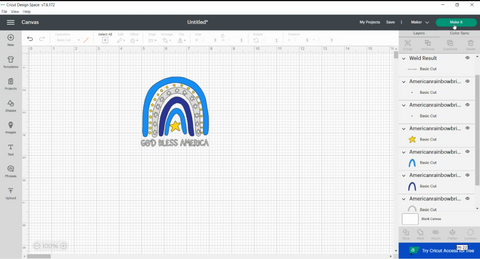
To start the process, you will need to download the free American Rainbow Bright SVG File from Pen and Posh. Upload the file into your cutting software of choice. Today I will be using Cricut Design Space with the Cricut Maker.

Open up a ‘New Project’ and insert the free SVG onto your canvas. I have pre-measured my can cooler and will be making the design a 3 in x 3 in working space. Change the dimensions of the design on the top menu bar. Keep the lock “locked” to keep the automatic scaling on.
Next, we need to ungroup the design. Click the ‘Ungroup’ button in the upper right corner. Select all the letters and use the ‘Weld’ button on the lower right corner to keep the letters as one unit when cutting.
If you’d like to get a good idea of how your can cooler will appear, use a quick mockup. I added a free square shape from the left side menu and changed the color to red for mine. I made the square as close to a can cooler shape as possible and sent the square to the back by right-clicking my mouse and selecting “send to back”.

Afterward, I changed the colors of the bows of the rainbow to the vinyl colors I had on hand and that would go well with the red can cooler. I wanted to make weeding easier on myself, so I also deleted the inner stars on the one inner bow. I deleted them one by one on the right-side menu bar under the layers panel. Test out your design on top of the square that we added as a mockup.

To ensure faster cutting and a better weeding experience, I welded the yellow dots of the design. I selected each one from the right-side layers panel by holding down the shift key on my keyboard and clicking each dot individually. Then I clicked the ‘Weld’’ button in the lower right-hand corner.
Now delete the mockup red square that we added. You do not want to cut that piece out of vinyl in the next steps. Click the ‘MAKE IT’ button on the right-side upper corner of the screen to proceed.
Add your colored vinyl to your cutting mats. Connect your cutting machine and set the tools and materials. I set vinyl as the material and used default pressure, then I loaded the mats into the machine, and pushed the flashing Cricut button when prompted. I continued this process until all colors and mats were done.
Next, I removed the cut vinyl from the cutting mats and proceeded to weed the vinyl with my weeding tool. For the smaller cuts like the words and dots, I used a technique called reverse weeding. This is where instead of removing the unwanted pieces from your design and then adding transfer tape on the top, you burnish the transfer tape on top of the whole design first and then turn over the tape with the sticky side up essentially removing the vinyl from the tape. This will leave the smaller cut pieces on the transfer tape and is ready to adhere to your object.

A word of caution, be mindful of where the larger vinyl is being pulled off so that you do not make the same mistake as I did. I had to reattach my dots because I was moving too fast.

I added the weeded elements to my transfer tape one at a time and then placed it onto my can cooler. Be sure to burnish with your scraper tool as needed to make sure the vinyl adheres to the cooler before removing your transfer tape.
That is it! Take a look at your magnificent craft skills, pop open your favorite can, add it to your cooler, sit back and enjoy your 4th of July in style.

We hope you had as much fun as we did on this project and that you had some fun making this craft with us. We would love to see your creations! Tag us @penandposh on Instagram or use the hashtag #CraftwithPenandPosh. We just may feature you on our social media!
CLICK HERE TO GRAB THE FREE SVG
To grab these free designs from some of my other favorite bloggers, click the links below:


Leave a comment
Please note, comments must be approved before they are published